
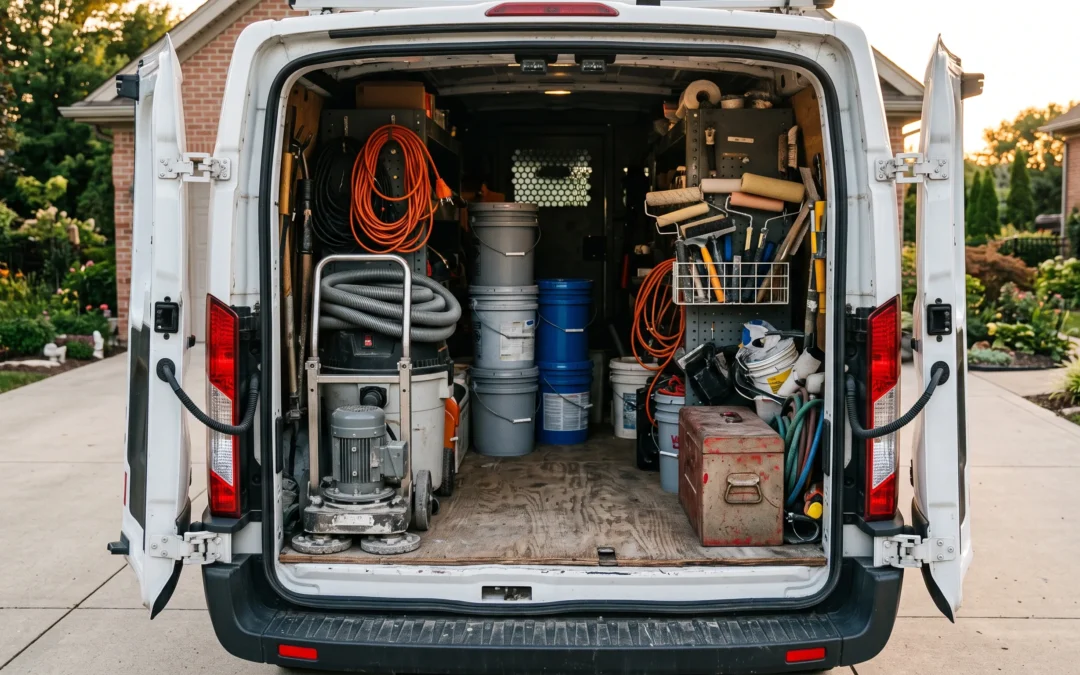
A complete epoxy flooring equipment list runs about thirty items across five phases: surface testing, mechanical preparation, repair, mixing and application, plus the safety gear that wraps around all of it. This article is that list — organized as a working checklist the way our own crews stage a truck the night before an install. Use it two ways: as a packing list if you’re equipping your own project, or as an audit sheet when a contractor shows up, because what a crew unloads in your driveway tells you more about the floor you’re going to get than anything on their website. We manufacture and install our own coating systems across Southern California, and every item below earns its place on our trucks.
Phase 1: Testing and Assessment Equipment
The instruments come out before any machine starts. Coatings fail from conditions nobody measured.
- Concrete moisture meter — screens the slab for the moisture vapor that peels coatings; high readings change the system to a moisture-vapor-barrier epoxy basecoat.
- Relative humidity and ambient thermometer — resin chemistry has a temperature and humidity window; outside it, cure quality suffers.
- Infrared surface thermometer — slab temperature, not air temperature, drives cure speed and dew-point condensation risk.
- pH strips / contamination check supplies — a water-drop test that beads on the surface exposes sealers and silicone before they become bond failures.
Phase 2: Surface Preparation Equipment
The heaviest hardware on the list, and the least optional. This is the phase that decides whether the coating bonds.
- Planetary floor grinder with diamond tooling — the machine that turns a sealed, weak slab surface into an open bonding profile. Segment grits get swapped to match the concrete’s hardness. This is the centerpiece of concrete grinding, and its absence from a contractor’s trailer is a walk-away signal.
- Hand grinder with dust shroud and diamond cup wheel — edges, corners and around obstacles the big machine can’t reach.
- HEPA dust extractor — connected to both grinders while they run; silica dust is a health hazard in the air and a bond breaker on the slab.
- Shop vacuum and clean brooms — the final full-surface pass after grinding; the slab gets vacuumed, never just swept.
- Floor scraper — lifts old coatings loosened by grinding, and later shears the excess off a cured flake broadcast.
- Leaf blower (exterior work) — clears grinding dust and debris from driveways and patios where a vacuum pass alone won’t finish the job.
Phase 3: Repair Equipment
- Angle grinder with crack-chasing wheel — opens cracks into clean grooves that repair resin can fill completely.
- Margin trowels and putty knives — work epoxy mortar into spalls, pits and popouts flush with the surface.
- Fast-cure repair resins and mortar components — staged with the tools so repairs cure in sequence with the day’s schedule.
Phase 4: Mixing and Application Equipment
- ½-inch low-speed drill — torque over speed; epoxy is blended, never whipped.
- Helical mixing paddles — fold the two components together without driving air into the batch.
- Graduated mixing buckets, plus spares — exact ratios and the double-pot transfer that catches unmixed resin on the bucket walls.
- Notched squeegees — meter the basecoat out at a controlled, consistent wet thickness.
- Shed-resistant 3/8-inch nap rollers with extension poles — the backroll that levels squeegee lines into a uniform film.
- Chip brushes and trim rollers — perimeter cut-in, stem walls and vertical faces.
- Spike shoes — access to the middle of a wet floor for backrolling and broadcasting.
- Spiked roller — releases trapped air from self-leveling and metallic pours.
- Broadcast media staged in buckets — flake or quartz within arm’s reach, because a full-rejection flake broadcast happens against the basecoat’s open-time clock, not after it.
- Painter’s tape, masking film, door thresholds — clean stop lines and overspray protection; crisp edges are equipment, not luck.
- Extension cords rated for the machines — grinders and extractors pull serious amperage; undersized cords trip breakers mid-grind.
Phase 5: Safety Equipment
- Respirators — silica-rated for grinding. (Our coatings are VOC-free, which removes the solvent-fume hazard from the application phase — the grinding dust hazard remains regardless of chemistry.)
- Eye and hearing protection — grinders are loud and throw debris.
- Nitrile gloves — uncured resin is a skin sensitizer; cured epoxy is inert, liquid epoxy is not.
- Knee pads — hours of edge work and detailing happen at floor level.
What This Checklist Looks Like at Different Project Scales
The list flexes with the job. A single-car garage floor coating runs on one grinder, one extractor and a two-person application kit — which is exactly why a trained crew finishes a flake garage in one day. Large commercial and industrial floors scale the same checklist up: ride-on or multiple walk-behind grinders, propane or high-voltage equipment where outlets are scarce, gauge rakes for thick self-leveling builds, and climate equipment — dehumidifiers and heaters — to hold big open spaces inside the resin’s cure window. Nothing on the checklist disappears at scale; items only multiply.
The Equipment Gap: Rental Counter vs. Professional Truck
Every item above can technically be rented or bought, so here’s the honest framing for DIYers weighing it. The application equipment is cheap and worth owning. The gap is in Phase 1 and Phase 2. Rental grinders are usually light-duty machines with tired diamonds that polish rather than profile the slab, moisture meters are rarely at the rental counter at all, and the judgment that interprets their readings can’t be rented. When we say the machine work is what you’re really hiring a professional for, this checklist is the evidence: over half of it exists to serve preparation and measurement, the phases with no visible glamour and total control over whether the floor lasts. If the equipment conversation has you leaning toward professional install, that’s the right instinct on any slab with moisture, damage or previous coatings.
Frequently Asked Questions
What equipment do I need for a DIY epoxy garage floor?
At minimum: a rented floor grinder with dust extraction, moisture meter, low-speed drill and helical paddle, graduated buckets, notched squeegee, shed-resistant rollers with poles, spike shoes, nitrile gloves and a silica-rated respirator. The grinder and meter are the two most skipped — and the two that determine whether the coating bonds and survives.
Can I install epoxy flooring without a floor grinder?
Not reliably. Acid etching — the usual grinder substitute — leaves the slab’s weak surface paste in place, can’t remove sealers or contamination, and wets the concrete right before coating. Every professional standard for resinous flooring specifies mechanical preparation, and diamond grinding is how that’s achieved on residential slabs.
What safety equipment does epoxy installation require?
A silica-rated respirator, eye and hearing protection during grinding; nitrile gloves whenever handling liquid resin, because uncured epoxy is a skin sensitizer; and knee pads for detail work. Solvent-based coatings add a fume hazard that VOC-free systems eliminate, but the grinding-dust precautions apply to every install regardless of the coating’s chemistry.
How much equipment does a professional epoxy crew bring to a house?
Roughly thirty items across five phases: testing instruments, a planetary grinder and edge grinder with HEPA extraction, crack repair tools, the full mixing and application kit, and safety gear. If a crew arrives with rollers and buckets but no grinder or moisture meter, they’re planning to paint your floor, not build a coating system on it.
Top Epoxy Flooring’s crews install the company’s own VOC-free coating systems with professional-grade equipment on every job, from single garages to full industrial floors across Southern California — residential work carries a limited lifetime warranty. Call (818) 945-0915 for a free estimate.
Recent Comments