
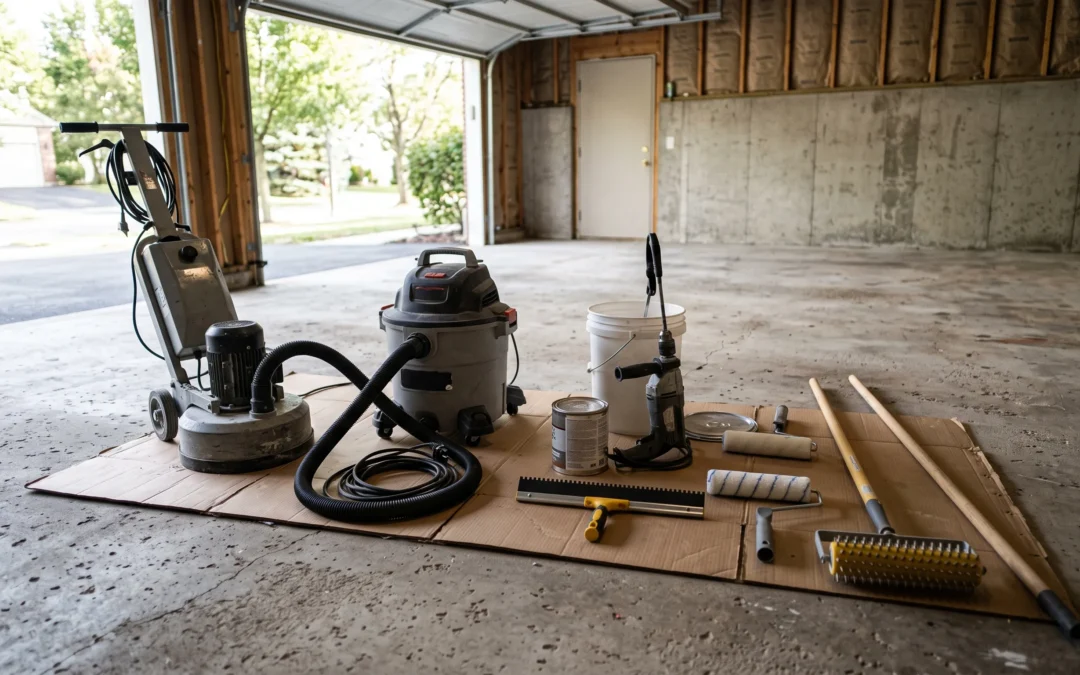
Installing an epoxy floor takes tools from four distinct jobs: preparing the concrete (a diamond grinder and dust-shrouded vacuum), mixing the material (a low-speed drill with a paddle and calibrated buckets), applying it (squeegees, rollers and brushes), and working over the wet surface (spike shoes and a spiked roller). Miss a tool from the last three groups and you’ll improvise your way through with a worse finish. Miss the first group and the floor fails — not cosmetically, structurally. Our installation crews run these tools every working day, and because we also manufacture the coatings they apply, we know exactly which tool problems show up later as material complaints. Here is the full lineup, what each tool actually does, and where the quality of the tool genuinely matters.
Preparation Tools: Where the Floor Is Won or Lost
Diamond grinder
The single most important tool in epoxy flooring, full stop. A floor grinder fitted with diamond segments strips the weak surface paste, curing compounds, sealers and old coatings off the slab and leaves behind an open, uniformly textured bonding profile — the surface epoxy needs to anchor into. Walk-behind planetary machines handle the field; a hand grinder with a matching diamond cup wheel does edges and corners. There is no hand-tool or chemical substitute that produces an equivalent surface, which is why the grinder is the tool that separates professional results from kit results. Our concrete grinding page goes deeper on the process.
Dust extractor / HEPA vacuum
Grinding concrete produces fine silica dust, which is both a serious lung hazard and a bond killer if it settles back onto the slab. A shrouded grinder connected to a HEPA dust extractor captures it at the source. After grinding, the same vacuum does the final pass — every square inch, because any dust left behind becomes a release layer under the coating.
Moisture meter
A small tool with veto power over the whole project. Concrete moisture readings decide whether the slab can be coated as planned or needs a moisture-vapor-barrier epoxy basecoat first. Skipping this measurement is how coatings end up blistered off the slab a year later.
Crack and repair tools
An angle grinder with a crack-chasing wheel opens cracks into clean V-grooves that repair resin can actually fill, and a margin trowel works patch mortar into spalls and pits. Repairs happen between grinding and coating — the coating prints whatever is underneath it, so the slab has to be right first. See our epoxy floor repair page for what that stage involves.
Mixing Tools: Small Category, Zero Tolerance
Low-speed drill with a helical mixing paddle
Two-part coatings must be blended completely — streaks of unmixed resin cure soft or never cure at all. The tool is a heavy ½-inch drill run slow with a helical paddle that folds material without whipping air into it. High speed feels productive and quietly fills the batch with bubbles you’ll meet again on the floor.
Calibrated mixing containers
Epoxy ratios are chemistry, not seasoning. Graduated buckets make the A:B ratio exact, and a second clean bucket for the “double pot” transfer — pouring the mixed batch into a fresh container and mixing again — catches the unmixed material that clings to the first bucket’s walls. Cheap insurance against soft spots.
Timer
Unglamorous, essential. From the moment the parts meet, the pot life clock is running, and a mass of mixed epoxy left in the bucket heats itself and kicks fast. Batches get mixed to match the pace of application — a rhythm the timer enforces.
Application Tools: Where the Finish Comes From
Notched squeegee
The spreading workhorse. The notches meter the coating out at a consistent wet thickness as you pull the puddle across the field — the fastest way to move a lot of material evenly before the clock runs out. Flat rubber squeegees do the same job for thin coats.
Rollers — the right ones
Behind the squeegee comes the backroll: a 3/8-inch nap, shed-resistant roller that levels the squeegee lines and evens the film. The “shed-resistant” part is not marketing — a bargain roller sheds lint into the wet coating, and every fiber is a permanent flaw under a glossy topcoat. An extension pole turns the backroll from a knee job into a standing one.
Brushes and trim tools
Chip brushes and small rollers cut in the perimeter, coat stem walls and step faces, and detail around anchors and drains before the field coat reaches them. On our installs the vertical surfaces are coated as their own step — one of the details that makes a garage floor coating look finished rather than painted.
Flake broadcasting (by hand)
Flake floors need no exotic tool — trained hands throw flake upward so it rains down evenly into the wet basecoat. What matters is quantity and coverage: a full-rejection flake broadcast continues until the surface can’t accept another chip. The tool that follows it is a floor scraper, run over the cured broadcast to shear off loose and upright flakes, then the vacuum again before topcoat.
Spiked roller
For self-leveling and metallic pours, a spiked roller rolled through the wet material pops entrained air bubbles and helps the coating find its level. On metallic epoxy floors, tools get creative — the pigment effects are worked with rollers, brushes, and even air movement, which is part of why no two metallic floors match.
Spike shoes
Strap-on soles with spikes that let an installer walk into the middle of a wet floor — to backroll, broadcast, pop a bubble, or rescue a stray leaf — leaving only tiny self-healing punctures. Without them, the wet floor is unreachable and every flaw beyond arm’s length stays there.
The Honest Take for DIY Installers
Most application tools on this list are affordable and worth buying properly — squeegee, good rollers, paddle, spike shoes. The preparation tools are the catch. Rental-yard grinders are typically small, underpowered machines with worn diamonds, and an inexperienced operator either barely scuffs the slab or gouges rings into it. Preparation is also where moisture testing, crack repair and contamination judgment live — the decisions, not just the machinery. That’s why our honest position is the same one we give in our DIY epoxy kit breakdown: if you coat your own floor, spend your effort and money on preparation; and if you can’t prepare it mechanically, that — not the coating — is the reason to call a professional.
Frequently Asked Questions
What is the most important tool for installing epoxy flooring?
The diamond grinder. Every other tool influences how the floor looks; the grinder determines whether the coating stays bonded at all. It creates the bonding profile that epoxy anchors into, and no chemical etch or hand sanding produces an equivalent surface.
Can I roll epoxy on like paint with just a roller?
You can physically do it, but you lose thickness control — the core of durability. A notched squeegee meters the coating at a consistent wet film and the roller’s real job is backrolling that film smooth. Roller-only application puts the coating on thin and uneven, which shows up later as fast wear paths and hot-tire pickup.
Why do epoxy installers wear spiked shoes?
To walk on the wet coating without ruining it. Spike shoes ride on thin spikes that leave tiny punctures the liquid immediately self-heals, letting installers backroll the middle of the floor, broadcast flake evenly, and fix flaws anywhere on the slab instead of only within reach of the edges.
What speed should epoxy be mixed at?
Low — roughly 300 to 600 RPM with a helical paddle, for the full time the manufacturer specifies, scraping the sides. Fast mixing whips air into the resin, and those bubbles surface in the cured floor as pinholes and craters. Slow, complete blending, plus a transfer to a second bucket, is the professional habit.
Top Epoxy Flooring runs its own crews with its own equipment and installs the VOC-free coating systems it manufactures — throughout Southern California, with a limited lifetime residential warranty. Call (818) 945-0915 and get a free on-site estimate.
Recent Comments