
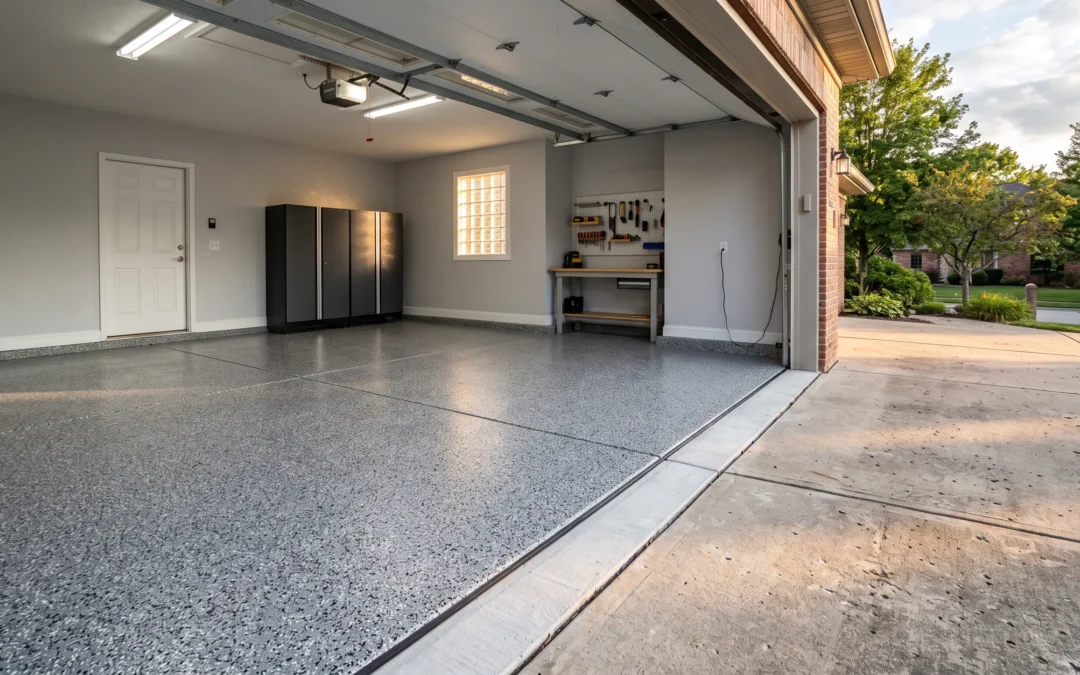
Installing epoxy on a garage floor follows the standard coating sequence — grind, repair, basecoat, broadcast, topcoat — but the garage adds four traps that no other room has: hot tires that peel weak coatings, oil that has soaked in for years, expansion joints that keep moving under the finish, and a door threshold where the coating meets sunlight and the driveway. Generic epoxy tutorials skip all four, and all four are exactly where garage floors fail. Having installed garage floor coatings across Southern California for years — with our own manufactured materials — here’s how each one is actually handled.
Gotcha #1: Hot-Tire Pickup
Park a car after a freeway drive and the tires sitting on the floor stay hot for an hour or more. On a thin or poorly bonded coating, that heat cycle softens the film while the cooling rubber contracts and grips it — and one day the coating comes up in tire-shaped patches. This failure is so characteristic it has its own name: hot-tire pickup.
The fix is not a special additive; it’s bond strength and thickness. A 100% solids basecoat locked into a ground bonding profile doesn’t care about tire heat, because there’s no weak film to grab and no smooth surface to release from. Hot-tire pickup is essentially the diagnostic signature of a floor that was etched-and-painted rather than ground-and-coated. For garages that see genuinely heavy vehicle abuse, a polyurea garage floor coating adds even more flexibility and heat tolerance on top of that bond.
Gotcha #2: Oil Spots That Have Soaked In for Years
Every garage has the spot under the engine. The problem isn’t the stain on the surface — it’s that motor oil wicks down into the pore structure, and concrete gives it back slowly for years. Coat over it and the oil keeps migrating upward into the bond line until the coating lets go in exactly that spot.
Degreasing the surface is step one, not the whole answer. The reliable treatment is to degrease, then grind the spot aggressively — deeper than the surrounding floor if needed — then test it: water should soak in and darken the concrete rather than bead. Stubborn legacy spots sometimes get a second degrease-and-grind cycle, or a spot-prime with a penetrating primer, before the basecoat goes anywhere near them. It’s tedious. It’s also the difference between a ten-year floor and a one-year floor with a bald patch under the car.
Gotcha #3: Expansion Joints and Cracks
Most garage slabs are divided by control joints — the sawn or tooled lines that give the concrete somewhere to crack on purpose. The instinct is to fill them flush and coat over for a seamless look, and with true expansion joints that instinct destroys floors, because the joint keeps doing its job under your coating and prints a crack straight through it.
The professional practice is to treat the two kinds of lines differently:
- Static control joints and dormant cracks — filled with rigid repair material, ground flush, coated over. Gone forever.
- Working joints — either honored (coated down into and through, so the line remains visible but sealed) or filled with a flexible, coating-compatible joint filler that can move without cracking the film.
Which line is which is a judgment call made slab by slab — and it’s a question worth asking any contractor you’re vetting, because the confident wrong answer (“we just fill everything”) is common.
Gotcha #4: The Garage Door Threshold
The coating has to stop somewhere, and it stops at the most abused strip of the floor: the door line, where sun hits it every afternoon, the door seal drags across it, and water blows in under the door. Three details matter here. The edge should be terminated cleanly at a defined line — ours is taped and hand-detailed, never feathered out to nothing, because a feathered edge is a peel-starter. The topcoat must be UV-stable polyaspartic; ordinary epoxy ambers visibly in that sunlit strip within a season or two. And if the apron just outside the door is crumbling, coating up to it looks half-finished — that’s a job for a matching driveway coating, which we often do in the same mobilization.
The Install Itself, Garage Edition
With the traps handled, the sequence is the familiar one, tuned for a garage: diamond grinding the whole slab including extra passes on tire lanes and oil spots; repairs and joint decisions; coating the stem walls and step faces first; rolling the basecoat; a full-rejection flake broadcast into the wet resin; scrape and vacuum after cure; then the polyaspartic topcoat. With fast-cure chemistry that is genuinely a one-day install for a flake system, with cars back on it in one to two days. Afterward, upkeep is minimal — a dust mop and occasional wash, as covered in our epoxy floor maintenance guide.
The honest DIY note: everything above is doable by a homeowner except reliably diagnosing the joints and fully purging the oil spots — those two are where experience pays for itself, and where our limited lifetime residential warranty exists precisely because we handle them ourselves.
Frequently Asked Questions
Why did my last garage floor coating peel where the tires sit?
Classic hot-tire pickup: a thin or weakly bonded film couldn’t survive the heat-and-contraction cycle of parked tires. It means the original coating was applied over inadequately prepared concrete — usually acid-etched, not ground — and it will recur with any similar product until the slab is ground and coated with a full-thickness system.
Should garage floor expansion joints be filled or left open?
It depends on whether the joint is still working. Dormant control joints and stable cracks are filled rigid and disappear under the coating; joints that still accommodate slab movement are either honored through the finish or filled with a flexible filler. Filling a working joint rigid guarantees a crack in the new floor.
Can you epoxy a garage floor that has old oil stains?
Yes — but the spots need degreasing plus aggressive grinding, then a water-absorption check before coating, because oil deep in the pores will otherwise creep up and break the bond. Surface cleaning alone is not sufficient for a spot that has been fed oil for years.
What happens at the edge where the epoxy meets the driveway?
A properly finished floor terminates in a clean, hand-detailed line at the door threshold, sealed under a UV-stable polyaspartic topcoat so the sun-exposed strip doesn’t yellow. Feathered, fading edges are a warning sign — that’s where peeling starts.
Top Epoxy Flooring manufactures its own VOC-free coating systems and installs garage floors across Southern California in as little as one day, backed by a limited lifetime residential warranty. Call (818) 945-0915 for a free estimate.
Recent Comments