
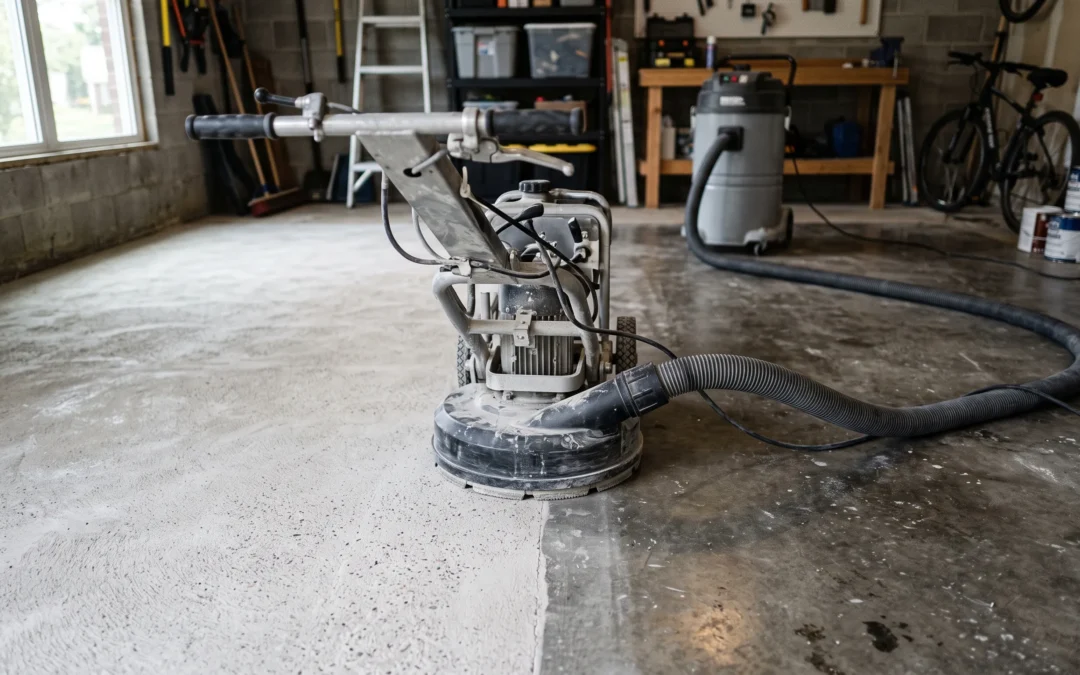
Prepping a garage floor for epoxy means one thing above all: mechanically grinding the concrete so the coating has a bonding profile to lock into. Everything else — degreasing, crack repair, moisture testing, the final vacuum — supports that central act. Notice what’s missing from that sentence: acid etching. The etch-with-citric-or-muriatic-acid step printed on every DIY kit is the prep method professionals abandoned, and the gap between etched and ground floors is the single biggest reason coatings fail. This post is only about prep — the coating steps live elsewhere — because in this trade, preparation isn’t a phase of the job. It is the job.
Why Prep Decides the Whole Floor
Epoxy doesn’t stick to concrete the way tape sticks to paper — it bonds by flowing into the slab’s open pore structure and curing there, mechanically keyed into the surface. That only works if the surface is open. A finished garage slab is anything but: troweling at the pour compacts and slicks the top layer, curing compounds seal it, years of tires burnish it, and oil and silicone soak into it. Coat that surface and you get a film resting on concrete rather than a coating grown into it — and films peel. Every failure mode with a name, from hot-tire pickup to sheet delamination, traces back to this. When we tear out a failed floor, the back of the peeled coating almost always tells the story: it’s clean, because it was never really attached.
Diamond Grinding vs. Acid Etching — the Honest Comparison
Both methods try to open the surface. Only one actually does it completely.
- Diamond grinding cuts. Rotating diamond-segment discs physically remove the top layer of the slab — the trowel skin, the laitance, the old sealer, the burnished lanes, all of it — and leave a fresh, uniform, open texture: the bonding profile. It works identically on every square foot regardless of what was on it, and it’s dry, with dust captured by a shrouded vacuum.
- Acid etching dissolves. The acid reacts with the surface minerals and roughens what it can reach — but it cannot touch sealer, paint, oil, or silicone, and on hard-troweled concrete it barely bites at all. It then has to be rinsed and neutralized perfectly, and it leaves the slab soaked, adding a day or two of drying. In practice it produces a floor that feels rough in some spots, glassy in others, and nobody can see which is which until the coating chooses where to peel.
Etching survives in the DIY world because it ships in a bottle and a grinder doesn’t. That’s the entire reason. Every professional specification for resinous flooring calls for mechanical preparation, and it’s why our crews grind every slab without exception — the case is laid out in full on our concrete grinding page.
What a Proper Bonding Profile Looks Like
Ground correctly, the slab changes character: uniformly lighter in color, matte rather than sheened, with a texture about like 100-grit sandpaper — enough tooth to key into, not gouges the basecoat has to fill. Water poured anywhere on it soaks straight in and darkens the concrete immediately. That water test is your acceptance check: any spot that still beads or resists absorption still carries contamination or sealer and needs another pass. The profile should be even across the whole floor, including the edges and corners the big machine can’t reach — that’s hand-grinder territory, and skipped edges are why some floors peel only along the walls.
The Rest of Prep: Repairs, Oil, Moisture, Dust
Grinding is the centerpiece; four supporting tasks complete the prep.
- Degrease before you grind. Oil spots get degreased first so the grinder doesn’t smear contamination across the slab, then ground aggressively, then water-tested. Deep legacy oil may need repeat cycles — a coating over a still-wicking oil spot will release there, every time.
- Repair after you grind. Cracks, spalls, and gouges are filled with rigid patch material and ground flush once set. Doing repairs after grinding means the patches bond to open concrete and finish level with the profile. Slabs with widespread damage are a different conversation — sometimes epoxy floor repair or full concrete resurfacing comes first.
- Test for moisture. A 24-hour plastic-sheet test tells you whether vapor is rising through the slab. If it is, the system needs a moisture-vapor-barrier epoxy basecoat — a material decision that has to be made now, at prep, not discovered after blisters.
- Vacuum like it matters, because it does. Grinding dust is the last bond-breaker. Vacuum the entire slab, let airborne dust settle, vacuum again, and stop tracking foot traffic across it. The floor is ready when a dark cloth wiped anywhere comes up clean.
Can You Do This Prep Yourself?
Honestly: mostly yes, with effort. Walk-behind grinders rent by the day, and a patient homeowner can produce a genuinely good profile on an open, unsealed slab — it is loud, dusty, physical work, and the rental machines are lighter and slower than commercial units, but it beats etching by a mile. Where DIY prep struggles is judgment rather than labor: recognizing burnished zones that need extra passes, knowing when an oil spot is actually purged, reading a moisture result correctly. If you do one professional-grade thing on a DIY floor, make it the grind. And if the prep list keeps growing as you read your slab, that’s usually the moment to get a professional garage floor coating quote and compare honestly — prep is most of what you’re paying for, because prep is most of what the floor is. A simpler slab treatment like grind and seal starts with exactly the same grinding step, which tells you how fundamental it is.
Frequently Asked Questions
Is acid etching good enough prep for garage epoxy?
It’s the minimum, not the standard. Etching can’t remove sealers, oil, or burnished spots, works unevenly, and leaves the slab wet for days. It’s why kit floors fail at such high rates. Diamond grinding removes the entire compromised surface layer uniformly, which is why every professional spec requires mechanical prep.
What is a bonding profile?
The open, uniformly textured surface left after mechanical grinding — comparable to 100-grit sandpaper — that lets liquid resin flow into the concrete’s pore structure and cure mechanically keyed into it. Without it, epoxy sits on the surface as a peelable film.
Can I rent a concrete grinder for a garage floor?
Yes — walk-behind grinders with dust shrouds are stocked at most tool rental yards, and a single-car garage is a realistic one-day DIY grind. Rental units are less aggressive than commercial machines, so budget extra passes on hard-troweled or sealed slabs, and rent an edge grinder for the perimeter.
How do I know when the floor is prepped enough to coat?
Three checks: water poured anywhere soaks in and darkens the slab within a minute (no beading), the surface shows a uniform matte texture including edges and corners, and a dark cloth wiped across it picks up no dust. Pass all three and the slab is ready for the basecoat.
Top Epoxy Flooring grinds every slab it coats — no acid, no shortcuts — and installs its own VOC-free manufactured systems across Southern California with a limited lifetime residential warranty. Call (818) 945-0915 for a free estimate.
Recent Comments